The following directories listed in your path were found to be non-existent: {PosixPath('/usr/local/nvidia/lib64'), PosixPath('/usr/local/nvidia/lib')} /usr/local/lib/python3.10/dist-packages/bitsandbytes/cuda_setup/main.py:166: UserWarning: /usr/local/nvidia/lib:/usr/local/nvidia/lib64:/usr/local/cuda-11 did not contain ['libcudart.so', 'libcudart.so.11.0', 'libcudart.so.12.0']as expected! Searching further paths... warn(msg) The following directories listed in your path were found to be non-existent: {PosixPath('//license-pai.cn-shanghai.data.aliyun.com'), PosixPath('http')} The following directories listed in your path were found to be non-existent: {PosixPath('dsw-registry-vpc.cn-shanghai.cr.aliyuncs.com/cloud-dsw/eas-service'), PosixPath('aigc-torch113-cu117-ubuntu22.04-v0.2.1')} The following directories listed in your path were found to be non-existent: {PosixPath('http'), PosixPath('8088/dsw-301739'), PosixPath('//127.0.0.1')} The following directories listed in your path were found to be non-existent: {PosixPath('Asia/Shanghai')} The following directories listed in your path were found to be non-existent: {PosixPath('tcp'), PosixPath('443'), PosixPath('//10.192.0.1')} The following directories listed in your path were found to be non-existent: {PosixPath('https'), PosixPath('//dsw-cn-shanghai.data.aliyun.com')} The following directories listed in your path were found to be non-existent: {PosixPath('tcp'), PosixPath('443'), PosixPath('//10.192.0.1')} The following directories listed in your path were found to be non-existent: {PosixPath('/home/pai/bin/python')} CUDA_SETUP: WARNING! libcudart.so not found in any environmental path. Searching in backup paths... DEBUG: Possible options found for libcudart.so: {PosixPath('/usr/local/cuda/lib64/libcudart.so.11.0')} CUDA SETUP: PyTorch settings found: CUDA_VERSION=118, Highest Compute Capability: 7.0. CUDA SETUP: To manually override the PyTorch CUDA version please see:https://github.com/TimDettmers/bitsandbytes/blob/main/how_to_use_nonpytorch_cuda.md /usr/local/lib/python3.10/dist-packages/bitsandbytes/cuda_setup/main.py:166: UserWarning: WARNING: Compute capability < 7.5 detected! Only slow 8-bit matmul is supported for your GPU! If you run into issues with8-bit matmul, you can try4-bit quantization: https://huggingface.co/blog/4bit-transformers-bitsandbytes warn(msg) CUDA SETUP: Loading binary /usr/local/lib/python3.10/dist-packages/bitsandbytes/libbitsandbytes_cuda118_nocublaslt.so... libcusparse.so.11: cannot open shared object file: No such file or directory CUDA SETUP: Something unexpected happened. Please compile from source: git clone https://github.com/TimDettmers/bitsandbytes.git cd bitsandbytes CUDA_VERSION=118 make cuda11x_nomatmul python setup.py install Traceback (most recent call last): File "/usr/lib/python3.10/runpy.py", line 187, in _run_module_as_main mod_name, mod_spec, code = _get_module_details(mod_name, _Error) File "/usr/lib/python3.10/runpy.py", line 146, in _get_module_details return _get_module_details(pkg_main_name, error) File "/usr/lib/python3.10/runpy.py", line 110, in _get_module_details __import__(pkg_name) File "/usr/local/lib/python3.10/dist-packages/bitsandbytes/__init__.py", line 6, in <module> from . import cuda_setup, utils, research File "/usr/local/lib/python3.10/dist-packages/bitsandbytes/research/__init__.py", line 1, in <module> from . import nn File "/usr/local/lib/python3.10/dist-packages/bitsandbytes/research/nn/__init__.py", line 1, in <module> from .modules import LinearFP8Mixed, LinearFP8Global File "/usr/local/lib/python3.10/dist-packages/bitsandbytes/research/nn/modules.py", line 8, in <module> from bitsandbytes.optim import GlobalOptimManager File "/usr/local/lib/python3.10/dist-packages/bitsandbytes/optim/__init__.py", line 6, in <module> from bitsandbytes.cextension import COMPILED_WITH_CUDA File "/usr/local/lib/python3.10/dist-packages/bitsandbytes/cextension.py", line 20, in <module> raise RuntimeError('''
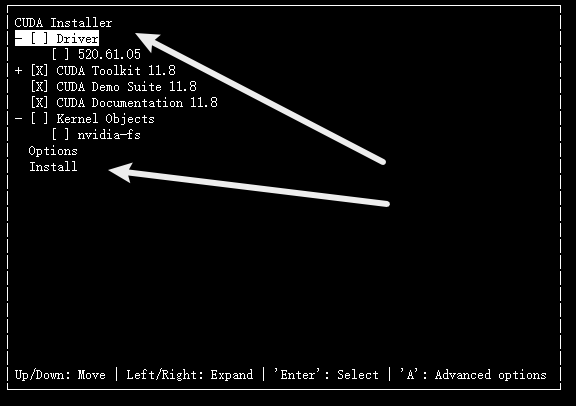
cd /mnt/workspace
wget https://developer.download.nvidia.com/compute/cuda/11.8.0/local_installers/cuda_11.8.0_520.61.05_linux.run
sudo sh cuda_11.8.0_520.61.05_linux.run